
There is the opinion that getting a Russian visa is a hard and time-consuming process. Actually, it’s not.
In order to obtain a visa, you need to make three simple steps:
- Get a visa invitation
- Fill in the form on the web of the MFA of the RF
- Apply to the consulate with the set of documents
In a few days, you can come to take your prepared visa.
The preparation of all the documents can take no longer than an hour in front of the computer but some of the beginners may have their difficulties. We have made the detailed manual describing the process step-by-step, containing the list of the necessary documents and examples how to fill them in so that you get everything right and obtain your visa without problems. Ready, set, go!
1. Do you actually need a visa?
If you’ve decided to come to Russia you will probably need a visa. This document gives you the right to cross the Russian borders and live in the country for a while. Russian visa is pasted into your foreign passport. It looks like this:
If you’re a citizen of the EU, the USA, Canada, Great Britain or Australia you will definitely need a Russian visa.
Only the citizens of the countries, which signed an agreement about a visa-free regime with Russia, can come to Russia without visa. Find your country on the map below and see if you need a visa. If you do, let’s investigate how to get it.
2. What visa do you need?
Russian visa can be issued in several types; which one to choose depends on purposes of your trip.
Russian Tourist visa
If you dream to make a picture near the St Basil’s Cathedral, walk by the Nevsky prospect, visit other Russian cities – choose a tourist visa.
| We recommend you to issue a tourist visa even if you are going to a conference or planning to visit your relatives (friends) because in this case the issuance process is the simpliest and the fastest. |
Visa is active up to 30 days, you can’t stay longer. The prolongation is only possible in case of illness.
More often, the consulate issues a single-entry visa. This means that you can enter and leave Russia only one time.
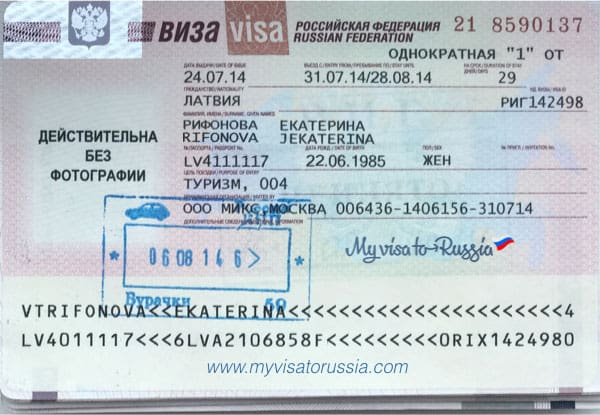
That is how a tourist visa looks
Get tourist visa
invitation for €19
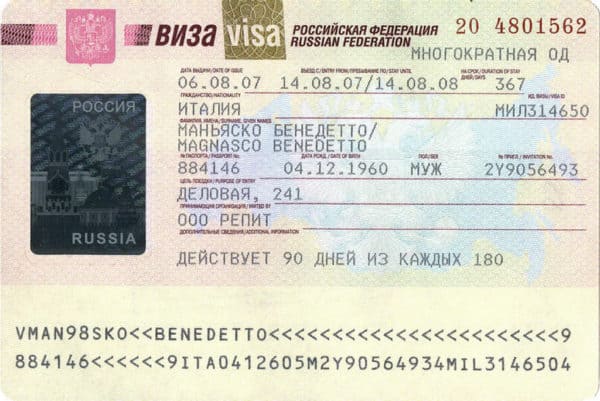
Russian Business visa
If you have a business in Russia or you plan a business trip you can arrange a business visa. It is issued for up to one year but in special cases it can be valid for even up to five years.
By having a business visa, you can visit Russia multiple times but you are not allowed to stay in Russia for more than 90 days in each half year.
Suppose, you obtain a business visa. You can live in Russia for 180 days in a year: 90 days in the first half a year and 90 days in the second one. You can’t stay for longer than 90 days without leaving a country.
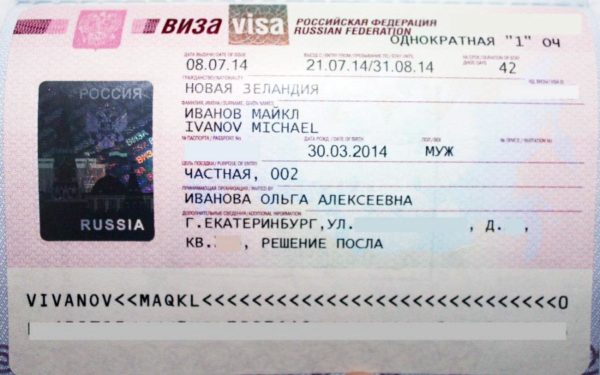
Private visa
If your relatives (or friends) live in Russia and you want to visit them, you can arrange a host visa a.k.a. private visa. It provides you with opportunity to stay in Russia for 90 days. However, we don’t recommend you this type of visa because the obtaining takes a long time. It also demands that the Russian citizen, who receives you, visit the AFMS in person.
| If you plan to meet your relatives or to travel through country we advise you to issue a tourist visa instead of the private one. It’s simplier, faster and cheaper. |
If you still want to issue a private visa, you will need:
- Your valid passport
- 2 copies of the application form, filled out and signed
- 1 photo for visa (made recently)
- Formal notification from the local FMS of Russia
The receiving party has to issue this notification and send it to you in a form or original. In order to do it, they need:
- Full name of the guest
- Date of birth
- Nationality
- Passport number
- Home address
- Dates of the entering and departure to/from Russia
The issuance in the Department of visas and registrations costs about 35$ and takes up to 2 months.
Work visa to Russia
If you plan to work in Russia, you need a work visa. It gives you the opportunity to be hired by any company in any position — there are no restrictions but firstly you need to get an invitation from your employer.
The work visa duration can amount from 1 to 3 years and you can come to Russia multiple times.

Other types of visa
Study visa is issued if you plan to get an education in Russia. Usually it is valid for no more than a year but if your education hasn’t been completed yet visa can be prolonged without leaving Russia.
Transit visa is issued in the cases you go to another country through Russia. You don’t need a transit visa if you are traveling by plane and change it in Russia without leaving an airport. The transit visa issuance don’t require an invitation but you need to demonstrate your train/plain tickets. Usually such visa is issued for up to 10 days.
Humanitarian visa is issued in the cases of charity, pilgrimage to holy places, cultural, school or student exchange, participation in sports events, etc.
3. What documents do you need for a visa?
Therefore, you have defined the type of your visa. Now you need to collect all required documents.
Step 1. Get a visa invitation to your visa
The invitation is an official document issued in the special form that contains your personal data, information about the receiving party, the purpose of your trip and duration of stay. Many people confuse noticing thinking that an invitation is a hotel reservation. These are different documents. An invitation is necessary for a visa unlike a booking.
The person who have invited you issues an invitation. If you are issuing a tourist visa then your tour company or a hotel will arrange the invitation. If you are going to visit some private person(s) in Russia so the invitation is their concern. In the case of a business trip, the receiving company will issue your invitation and work visa will be issued on the ground of an invitation from the employer.
An invitation is issued in the Russian language. Some consulates ask for an original form, others can be satisfied with the copy.
If you are obtaining a tourist visa and have already picked up the hotel, call them or write by e-mail. Ask if they can send you an invitation by fax or e-mail. Sometimes hotels take from 20 to 50 dollars for the arrangement of an invitation, but some can send it free if you have already reserved a room and paid for the living.
Get tourist visa
invitation for €19
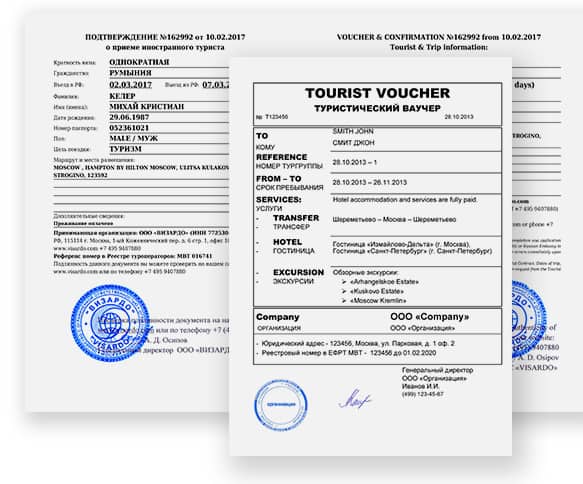
Tourist invitation consists of two documents: a tourist confirmation and a tourist voucher.
If you want to avoid troubles and make it all quickly, you can apply to the organization that arrange invitations online. In our company the issuance of an official tourist invitation for a Russian visa takes 5 minutes and costs 1500 roubles, business/private invitation’s price is higher.
We work in a partnership with licensed tour operator and with the FMS of Russia so everything goes within law. We send your arranged invitation to e-mail; in most of the cases copy is enough; sometimes (if you need original) we can send it by mail to any address.
How to arrange a tourist invitation to Russia online
- Pick up your citizenship from the list
- Write your personal data in the appropriate boxes: name, surname, gender, date of birth, passport number, duration of its validity, e-mail where we will send the invitation.
- Note the alleged dates of your trip.
- Pay by the safe way (credit card or PayPal).
- That is all. In a few minutes, your invitation will be sent to your e-mail. Open it, print out in one copy. The form of a copy is enough for the consulate; you do not need an original form.
Step 2. Arrange your medical insurance
Citizens of Great Britain, the USA, Australia or Canada don’t have to issue a medical insurance. If you are a citizen of another country you will totally need it for your Russian visa (the insurance coverage should amount 30 000 euros). This document has to be valid in the whole territory of Russia for the whole period of your trip. You can issue it online and get on the same day.
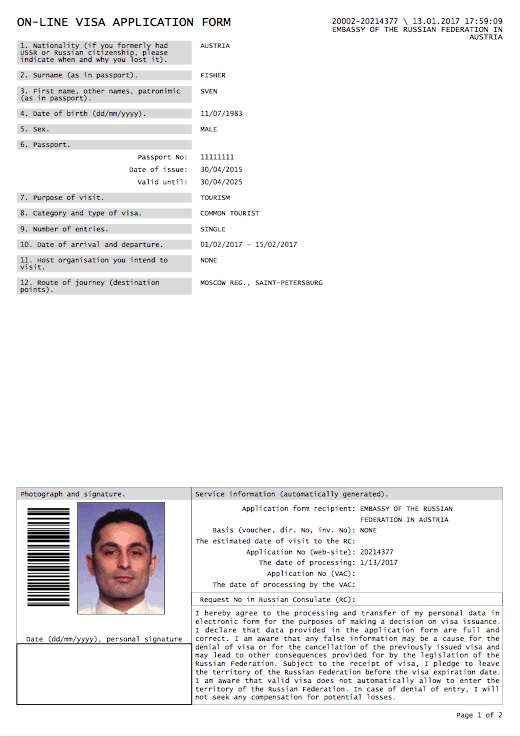
Step 3. Fill in the visa application
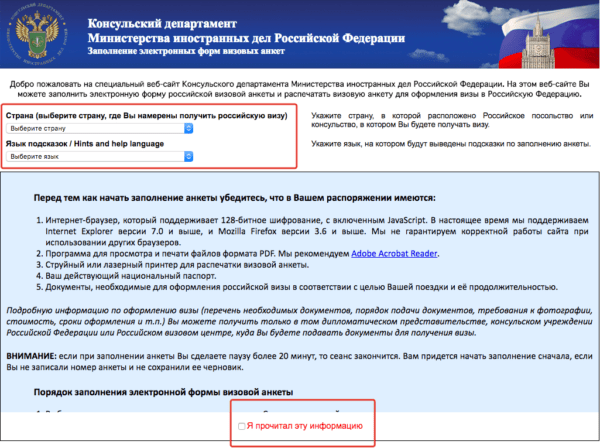
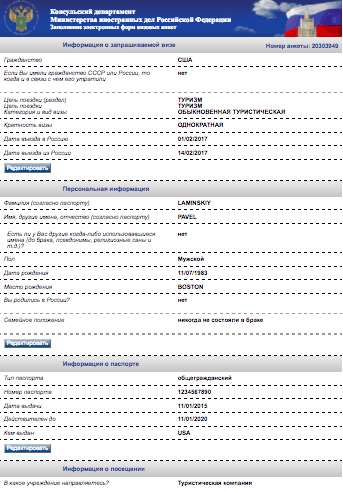
Now, when you’ve planned the duration of your trip and got a medical insurance and an invitation, open the website of the Consular Department of the MFA of Russia and fill in the application form. You can do it online in Russian or English language.
- Choosing of the country and the language. In the beginning, you will have to choose the country where you live and the language you prefer to be asked. Read the rules of filling the application and check «I’ve read this information».
If you have chosen the Russian language, write all the answers in Russian except for names, surnames, addresses and names of organizations (for these boxes use English).
If the surname/name contains specific national letters missing in the Latin alphabet (for example, Ñ, É, Ü or Ç) write it just the same way as in your foreign passport. For example, you should write Seo Tuerre instead of Séo Türre.
If you are filling out your application in English, use English for all the answers. Use the Latin alphabet only.
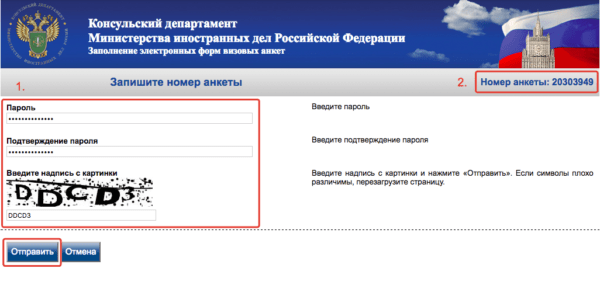
- The number of your application and password. Your application has been created with a particular number. Write it somewhere for the case you need to restore it. Make up the password you can remember. By having the number and the password, you will be able to open your non-ready application and add the missing information. In the case you forgot the number or the password, you wouldn’t be able to restore them so you would have to start filling the application from the beginning.
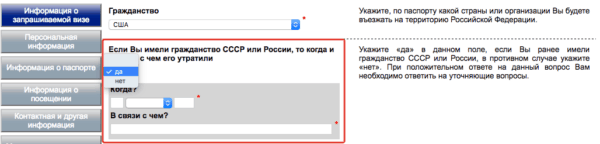
- Information about the visa you ask for. In this paragraph, you need to note your citizenship.
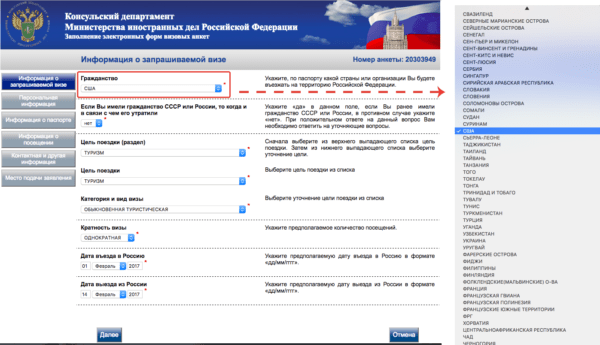
Then you need to answer if you have had the Russian citizenship (or the USSR citizenship). In the case you had, note when and why you have lost it.
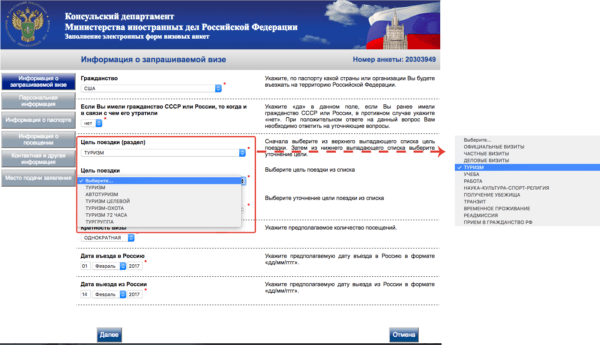
Now tell about the purpose of your trip. If you have issued a tourist invitation, note tourism as a purpose. In the case of a private invitation, the purpose will be a private visit. If you have a business invitation, note «business visits» in this box.
After that, you need to clarify your purpose. For example, if you choose tourism you have to explain whether it is a purpose tourism, or a tourism in the organized group, or a tourist hunting, or a tourism by 72-hours program, or some other kind.
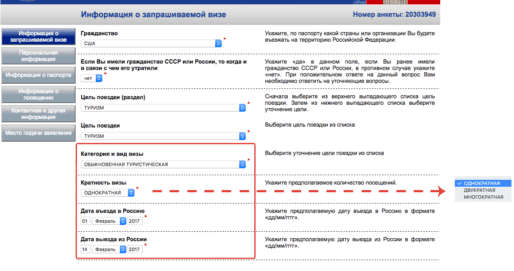
The dates of entering and departure has to match the dates in the invitation.
Now you have to describe your visa: type, category (single-entry/double-entry/multiple-entry), note the dates of entering and departure.
- Personal data. That is the paragraph where you tell about yourself. Write your name and surname in the same way as in your foreign passport. Do not write short/second names in the case you don’t have them written in this passport.
- Passport details. Note the type of your passport (if you are traveling by a foreign passport, choose a general civil), number, date of the issuance, validity and the organization that has carried out the issuance.
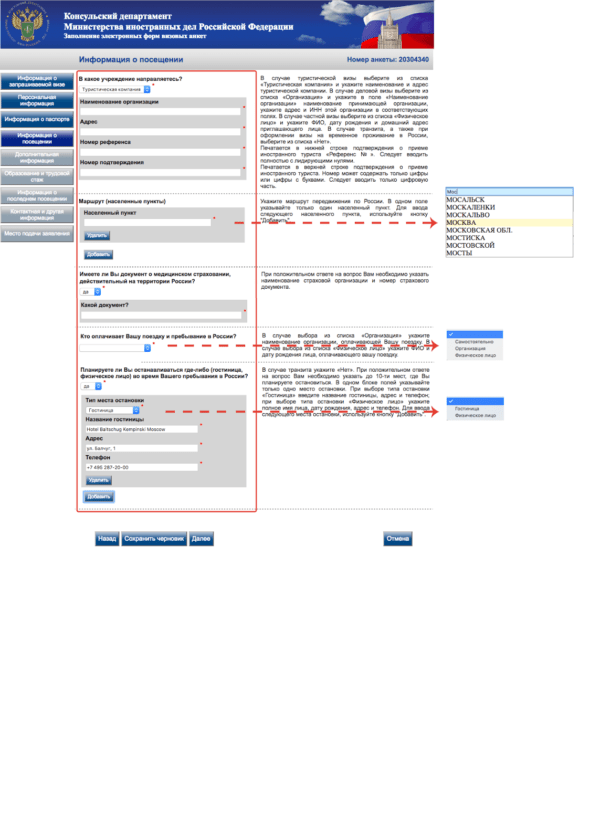
- Visit information. That is the paragraph about the destination of your trip. Take all the information from your invitation to fill it in correctly. For example, in the case of a tourist visa, in the paragraph «Organization of your destination» write all the data from your invitation. In the paragraph «Route» choose the cities you are planning to visit (you can choose several by pressing the «Add» button). In the appropriate box write the number of your medical insurance and the exact name of the insurance company.
In the case you pay for your trip by yourself, choose «Independently» in the paragraph «Who pays for your trip and stay in Russia?». If you are a retired person/pupil/student and your relatives are paying for your trip, choose «Private person». If you get money for the trip from some kind of educational institution or from a company, choose «Organization».
In the last paragraph write contact information of the places where you are going to live in Russia. If you are issuing an invitation with our help, you will get an instruction with an address and other required data.
All boxes have to be filled. For example, if your hotel does not have a phone number, don’t leave this box empty. Write any numbers in it, for example, 111.
- Additional information. That is the paragraph where you should answer (shortly) the questions about previous criminal records, diseases, visa rejections, cases of deportations, military service, etc. Be honest because all the information will be checked.
- Education and work experience. Note where (besides school) you have studied and described two of your previous jobs. Don’t write where you’re working now (there is a special box for it below).
If you are on retirement indicate the two last jobs.
| If you have never studied/worked write about it in your cover letter. | A template of the cover letter |
If the company where you have worked, closed or moved to another address, indicate the address that it had when you worked there. If you don’t remember the phone number of the company, write any numbers but don’t leave this box empty.
If you don’t remember where you have worked (and you haven’t any documentation), answer that you have never worked and written about it in the cover letter.
- Information about the previous visit(s). Describe your visits (not only to Russia but also to other countries). If you don’t remember the exact dates write the approximate ones.
- Contact information. Write the names of your parents, home address and phone number.
In the box «Personal phone number» write the number of your mobile phone (not of the landline). If you don’t have any, write the number of your relatives/friends.
Indicate the place where you work/study now. If you are on retirement, answer «Yes» for the question «Do you work/study?» and then write «Pensioner» in the boxes «Work place» and «Position». Write «No» in the box «Address» and indicate any numbers in the «Phone number» box.
- Place of appliance. Choose the place where you’re going to apply for a visa. For example, if you have written that you live in Austria, you will be offered to choose a consulate/visa center located in Austria.
That is all, your application is ready. Double-check it, save and print it out in two copies.
Print it out using only white, opaque A4-sized paper. Your application in the color paper will be declined. Use the color cartridges and print only on the one side of the paper. Duplex printing is not allowed.
After the receiving, you still can make changes in your application. Go to visa.kdmid.ru/RetrievePage.aspx and fill in four boxes: application number, your surname, date of birth and the password. Your application will get a new number; don’t forget to write it somewhere.
Visa application is valid within 30 days since the moment of applying.
Step 4. Check the passport
Your foreign passport must have no less than two blank pages for a new visa. It should be valid for no less than 6 months after your alleged departure from Russia. If there are no blank pages or the validity ends, you’d better issue a new passport.
While applying for a visa, you present a valid passport but there is a chance you will be asked to present the previous ones (in the case you have them).
Step 5. Make two photos
You will need 2 color photos 35mm x 45mm. Make a photo on the light background, full-face, without dark-glasses. That should be the pictures of a good quality: clear, no pixels, not blurred.
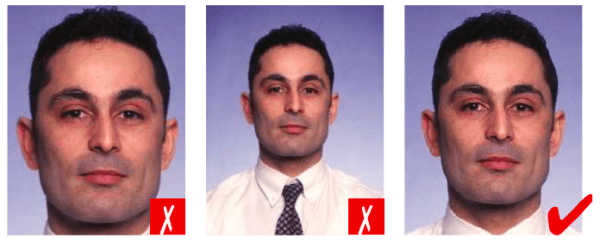
Paste it carefully into the special frame in your printed application. Write a date and a signature in the black frame below the photo.
| If you are traveling with kids, be ready to present their birth certificates and copies of their parents’ passports. |
4. Where to apply for a visa
You should present all the collected documents in the Russian consulate (or in the Visa Center of your native country). If you are a citizen of a Schengen country, you can also obtain a visa in any of other Schengen countries.
If you have a citizenship of one country but live in another one, you can obtain a Russian visa in the country of your living in the case you have a residence/work permit.
5. How much does the visa cost? How much time does the issuance take?
Russian visa for citizens of some country costs as much as this country’s visa for Russians. Schengen visa for Russians costs 35 euros; that’s the price that members of the EU pay for a Russian visa.
Moreover, the visa price depends on the place of the issuance (Russian consulate or Visa Center).
You can obtain a visa by the cheapest price in a consulate or in an embassy but sometimes it means that you have to stand in line or make an appointment preliminarily. If some document is missing or some mistake is made you can’t fix it right in the consulate so you must make an appointment again.
Visa cost for the citizens of the EU, the USA, Canada, Great Britain
| Visa type | |
|
|
|
| Single-entry | 35 € | 140 $ | 140 $ | 50 £ |
| Double-entry | 35 € | 140 $ | 140 $ | 65 £ |
| Multiple-entry | 35 € | 180 $ | 150 $ | 200 £ |
In some countries, Russian consulates take applications through the Visa Center that allows to avoid lines and makes the procedure simpler. The issuance through the Visa Center is more expensive. For example, in the European Union, it means extra expenses amounting 25-30 euros. But you can make an appointment several days before receiving; also, you will get assistance while filling in the application, obtain copies of the documents required and in addition, you will get a number of your application so that you can track its status. When the visa is ready, you can have it delivered to your house or to the workplace.
It’s necessary to add the receipt confirming the payment of a consular fee to your visa documents. But first ask about the better way of payment in the consulate. For example, Russian consulate in Canada don’t accept cash, checks or card payment — you can only transfer money from your bank account.
A tourist visa is issued faster than others (within 7-10 days). Business visa’s issuance takes from 3 days to 2 weeks, private one — from 7 days to 1 month.
If you need visa urgently you can use a service of a fast-track issuance. In this case, it will take 3 days but the price will be two or three times higher.
After receiving your documents, you will be told when to come for the passport and the visa.
7. How to lower the possibility of visa rejection
In most of the cases, it’s not criminals who get a visa rejection but ordinary people filling the documents without paying attention.
- Check the validity of your passport. You won’t get a visa if it is valid for less than 6 months after the alleged departure from Russia.
- Issue your invitation only in the official organizations who have the license. If it falls on the tour company, check if it is included in the Unified Register of Tour operators. The authenticity of your invitation can be checked on the web of the MIA of the RF. If your invitation is a fake or it is issued by the non-licensed organization you will get a denial of visa.
- Collect the full document package. Check the documents so that they don’t contain any mistakes or inaccuracy.
- Make sure that the purposes of your trip, cities that you plan to visit and the hotel in your application match the ones in the invitation.
- Dates of your trip in the application must coincide with the ones in the invitation.
- Don’t breach the law. You wouldn’t get a visa if you didn’t pay the fine, violated the duration of your stay in the country or were forcibly deported.
8. After the arrival
When you come to Russia you will have to fill in the migration card and register. This process has its specific details.
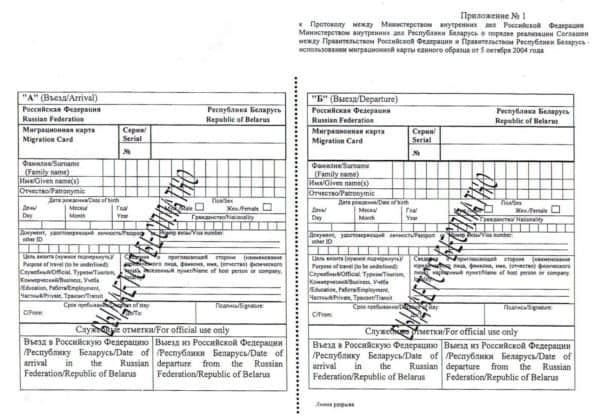
Migration card
You usually get it coming through the passport control in an airport or at the Russian customs (in case you cross the border by train, autobus or car).
The migration card consists of two equal parts the size of a passport page. You fill in both. Then the employee of a custom tears one of them off and takes it; another one stays in your hands. Put it into your passport and don’t lose because you will have to show it to the customers when abandoning Russia.
Registrations after an arrival
If you plan to stay in Russia for no longer than 7 days you don’t have to read the information below because there is no need to register for you. In the other case, the registration is necessary.
By the Russian law, you have to register within 7 days since your arrival to the country. It is necessary for the migration service so that they know where you are living. In the case you change cities, you will have to register in each of them.
The registration is very important. If you are staying in a hotel the registration falls on the administrator; in the case you live at your friends/relatives, they have to register you. You just need to make copies of the first page of your passport, your visa and the migration card that you’ve filled in at customs. The person who registers you should have all these copies.
Remember
- In order to obtain a Russian visa, you need passport, invitation, medical insurance, filled visa application, 2 color photos 35mm x 45 mm and a receipt confirming the payment of a consular fee.
- Visa is issued by Russian consulates or by the Visa Centers of your country.
- The duration of the issuance depends on the visa type. Tourist visa takes 7-10 workdays, business one requires from 3 days to month, private visa can be issued within 1-2 month. If you need to get a visa as soon as possible, use the fast-track issuance service.
- When you come to Russia, you have to fill in the migration card. Keep your exemplary safe for the whole period of the trip.
- If you stay in one city for longer than 7 days you will have to register. It falls on the person you stay at.